
Hi everyone,
How has your week been? I, personally, am looking forward to the weekend! I've been on a bit of a crafting streak (I was in a bit of a creative rut after Christmas!), and now I have a whole list of things I want to start making and finish. Anyway! I have a tutorial for you today!
One of my new favorite stores is what my family and I have christened the "Japanese dollar store," though its actual name is Daiso. If you have one in your area, I highly recommend checking it out! Almost everything in their store is $1.50. They have a ton of crafty things too! Lace, beads, felt, and even fabric (though the fabric, as I've found out, looks really nice, but the quality is not the best). And I also discovered that they have 20 gauge wire, which is nice, pliable wire for crafts, and I love it for jewelry. Right after I bought it, I knew what I wanted to make. Have any of you seen those "love" necklaces that have been floating around lately? Like this one:

I love the look of these so much! I made one for my sister as her Christmas present, and attached a clay feather that I had made. She really liked it, and I loved how it turned out, so I decided to make one for myself, and I made up a tutorial to go along with it.(:

You'll need:
Some 20 gauge wire in the color of your choice
A necklace chain
Several jump rings
A needle nose pliers (though of you don't have one, you can just use your fingers)
A small decorative charm (if you like)
Scratch paper and a pencil
Wire cutters
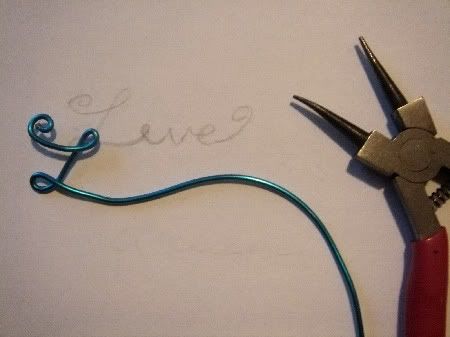
First: Write the word of your choice (eg. Love, Dream, Believe). Make sure it's in the size that you want and that you'll have somewhere to attach the jump rings (I drew little swirls to hook them onto).
Second: Take your wire and begin "tracing" along the letters. Use them as a guideline for curves and turns. Your needlenose pliers will be especially helpful when you need to make a curve, swirl, or sharp turn.
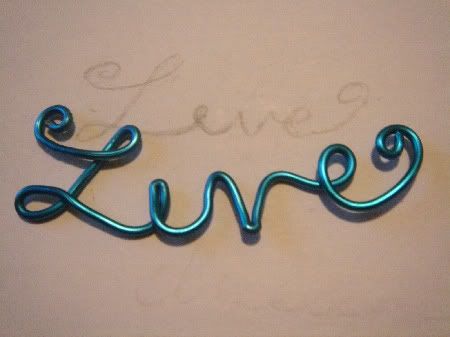
Third: Trace along your letters until you reach the last swirl. Then, take your wire cutters and snip the ends, leaving about an inch or so left to work with. Make your final swirl, and you've finished your word!
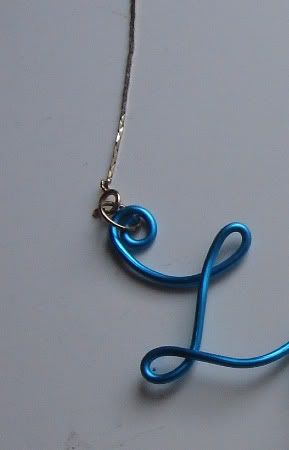
Fourth: Using jump rings, attach a necklace chain. As you can see, I have the clasp connecting to the curve on the L, and the other end of the chain looped around the swirl in the E.
Fifth: (Optional) If you like, slip a small charm onto a jump ring and attach it to the base of one of your letters.
And voila! You have a charming necklace!
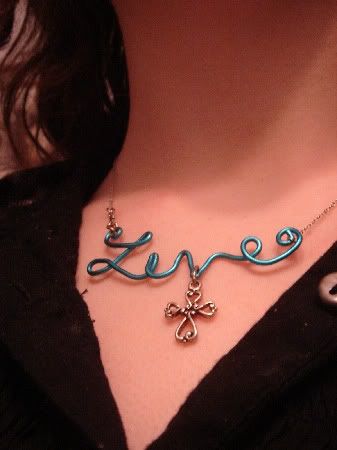
I chose to make the word "Live" for my own necklace, and attach a little cross. The meaning behind this may be obscure to some, but it comes from St. Paul's letter to the Philippians, 1.21:
"For me to live is Christ, and to die is gain."
When I wear this necklace, I shall ever be reminded of these words.
There are limitless possibilities to where you can go with this technique. You could just make a pretty swirl, or just one letter, say the first letter in your name! You could also do a short phrase.

I like how creative you are simple yet effective
ReplyDeleteHey Vicki its Awesome..I love the tutorial..amazing! keep rocking girl ~
ReplyDeleteThanks so much, Brooke! ^^
ReplyDeleteI LOVE this as a necklace! Beautiful! I found you through Think Pink Sundays. Thanks for sharing! :)
ReplyDeleteloooooooveeee that necklace! follow me: chiccupcake1.blogspot.com
Delete