Wednesday, June 29, 2011

From Blah to Art

Hi everyone,

This is a project I did a really long time ago and only just photographed the finished project. I took an old Barbie accessory holder that had been in the giveaway bin and was scratched up and pretty ugly, and gave it a new life. It started out looking like this:


Then, I cut off the front flap. I used a Sharpie to draw a vintage style Barbie silhouette on the back, then made a mini collage with ripped up sheet music and phone book paper. Then I took my vintage set of fashion plates, which is the same model as this, and one of my favorite toys:


...and used it to make some fun outfits. I colored them in with colored pencils and cut them out, then glued them to the holder. I added some grosgrain ribbon along the sides and two large buttons covered the snaps where the plastic flap had originally been.

And I ended up with this:


Preatty cute, huh? I really love how it turned out...it has two little drawers in the front, which are perfect for storing my hair accessories, and it's also a lovely decoration.(:

Have a lovely day!

~Vicki

Tuesday, June 28, 2011

Another Circle Skirt...

Hi everyone,

How is your summer so far? Here, it's just beginning...seventy degree weather, sunny or overcast. I like the cooler weather, though I had been looking forward to wearing more of my summer clothes...hopefully I'll have a chance to do that soon!

Do you remember the post I did, wow, almost a year ago on my circle skirt? Well, I made another one awhile back, using some vintage plaid fabric that I found at a thrift store for cheap. The fabric was a surprise to me because when I bought it, it was folded so you couldn't see the front, and the back was a brown color with a light plaid pattern. It wasn't until my mother washed it for me that I saw -- WOW, it's plaid! And I liked it a lot better, actually. I figured it was the perfect fabric for a circle skirt, and since it was heavy, it'd be ideal for cooler days. Also, it was a lot easier to hem than my first one because the fabric was heavier and didn't fray. The only tricky part came when I decided to put in a zipper...ummmmm....I don't know why, but zippers are not my friends. It turned out looking ok, but since it was my first zipper, it definitely wasn't perfect! I've improved my zipper-sewing skills quite a bit since then, though they are still not my favorite things to sew.

ANYWAY - here's the finished result! I styled it to look very forties or fifties, again channeling my inner Nancy Drew. All of the different shades of brown look so fun to me!


(This was supposed to be a full-body shot, but I forgot to think about the lighting, and there's a really bad shadow on my face!)


super cute, huh? The only thing about this is that this is the only top that I had that would match the skirt! I don't have any other shirts or blouses that really match...maybe I'll pick one up one of these days!

Have you ever made a circle skirt? I'd love to see photos of your projects!(:

Have a lovely day!

~Vicki

Monday, June 27, 2011

Ruche-Inspired Necklace

Hi everyone,

I'm finally back, and ready to start posting a bit more regularly.(: I finished my first year of college last Thursday, and may I say, it feels SO good! Although I am sad to leave behind my teacher and mentor for the past three quarters...I'll even miss his crazy ten-page essays, haha (my final ended up being a whopping 19 pages!). But although this is the end of one chapter of my life, it's the beginning of a new one, which gives me something to be excited about. I also plan on doing much more blogging...I hope!

Anyway, I made this necklace around the beginning of this month, when I was sick and tired of studying, and just wanted to use my hands (and not so much my brain). AND I even typed up a tutorial! There aren't any pictures, but it's pretty easy to figure out, even by just looking at the picture.
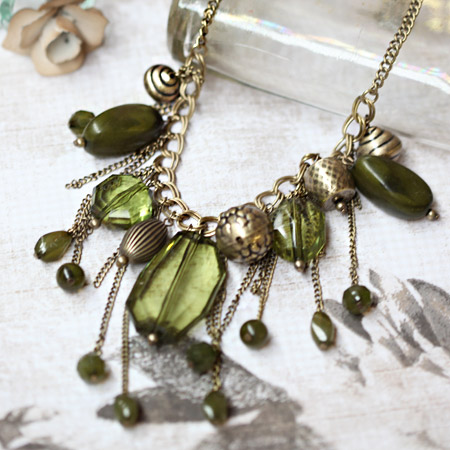
Here is my inspiration:


You'll Need:
Needlenose Pliers
Assorted beads (you'll want some small ones and then a few chunky ones...I used green glass beads and a few silver ones)
Straight pins
Necklace chain
Slightly thicker chain (just needs to be thick enough to hook the beads onto.)
A chain in a contrasting color
A couple of jump rings


How To

This is a fairly straightforward necklace. It can be a bit tricky working with the pliers and chains, but once you get the hang of it, it's easy as pie. You should be able to find all of these materials (if you don't have them already) at your local craft store.

1. First, lay out your pattern, and get an idea of how you want the beads arranged. What I did was to take one large bead and make it the centerpiece, and then work from there. It can be a pattern, but it doesn't have to be. Make it as eclectic as you choose!

2. Now, start sliding your beads onto the straight pins. If the holes of your beads slide over the ends, simply take a smaller bead (like a seed bead), and put that on first so the beads won't slide off.

3. Take your pliers and bend the top of the straight pin into a u-shape, then slide your pin with the beads onto the thicker chain, then use the pliers to bend the U closed.

4. Repeat step three for all of your beads.

5. Now, take your contrasting chain and break it into four (or as many as you wish) parts, so you end up with two chains that are about 2 inches long, and two that are about 2 1/2 inches long. (You can probably just separate these with your pliers...if they're made up of big enough links, just use your pliers to pull them apart)

6. Using your pliers and a jump ring (one for each piece of chain), attach the contrasting chains to the thicker chain, interspersing them between the beads. I put two close to the center, and the other two out towards the edge.

7. Take your necklace chain, which can be any length you like, and using jump rings and pliers, attach it to the ends of the thicker chain.

8. You have a gorgeous necklace! Wear it with pride!(:

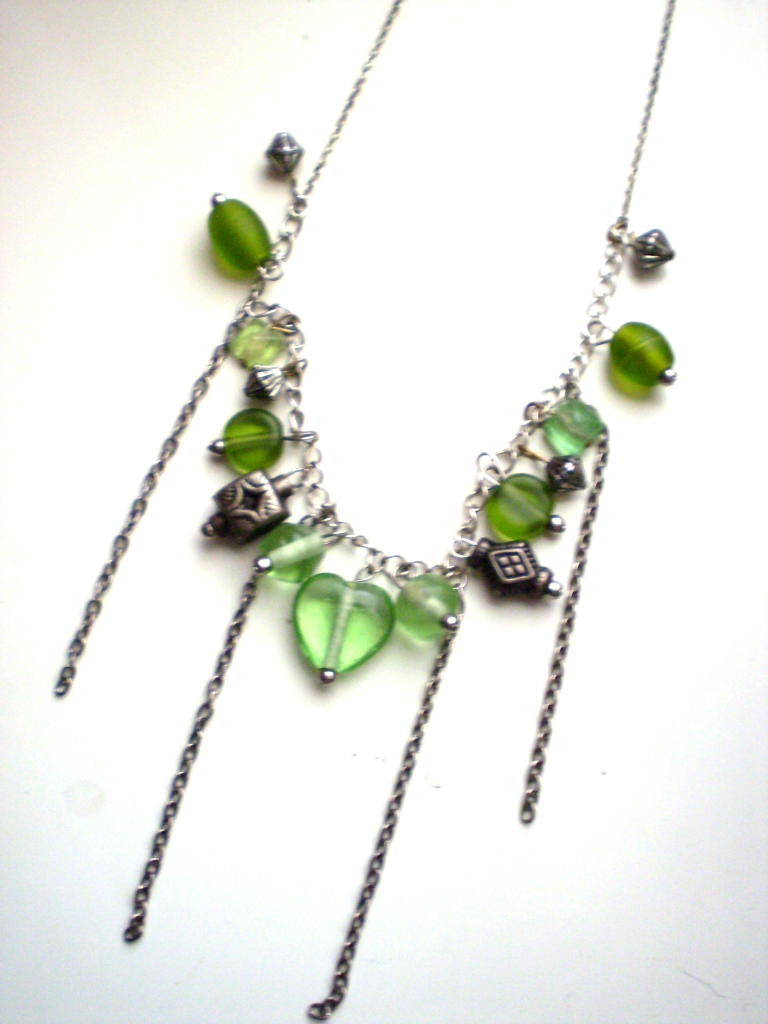
Here's my finished product:


Be sure and let me know if you try it out!!(:

Have a lovely day~!

~Vicki

Tuesday, June 14, 2011

Decoupaged Easter Eggs

After Easter and all the baskets and egg hunts, I was left with a handful of plastic eggs. I knew I wanted to do something with them, but I wasn't sure what. Then I remembered what my friend Khadija had done to recycle her eggs -


So I took my telephone book pages and mod podge, covered the eggs, then added some lace and fancy silver and gold string. This is how they turned out:


I added them to a pretty glass bowl, along with some origami stars, and it was perfect!


Pretty, huh? And so simple, too!(:

Have a lovely day~!

~Vicki